Technical Deep Dive: Build no-code agreement agents with Docusign and Microsoft Copilot Studio
Discover how Docusign and Microsoft Copilot Studio empower teams to build no-code conversational agents that automate agreement workflows, and learn how to create and deploy a Docusign agent directly in Copilot Studio.

In today’s AI-first workplace, every team is looking to streamline manual, repetitive processes and move faster. That’s exactly where the integration of Docusign and Microsoft Copilot Studio comes in.
This powerful combination enables citizen developers and business users to build their own conversational agents—without writing a single line of code. Whether you’re sending NDAs, offer letters or customer contracts , you can now create intelligent agents that connect to Docusign using prebuilt actions, all powered by natural language.
The result? Agreement workflows that are smarter, faster, and seamlessly embedded into daily operations.
In this post, you’ll learn what’s possible today, walk through a real-world scenario, and see how to build your first Docusign agent in Copilot Studio.
What’s possible today with Docusign in Copilot Studio
Microsoft Copilot Studio is an end-to-end conversational AI platform that empowers you to create agents using natural language or a graphical interface. With Copilot Studio, you can easily design, test, and publish agents that suit your needs for internal or external scenarios across your industry, department, or role. You can build a standalone agent or publish to Microsoft 365 Copilot.
Docusign actions available as Tools
Using Docusign for Microsoft Power Automate connector, you can expose key agreement actions as Tools in Copilot Studio and design agents that:
Trigger Docusign tools directly when the agent detects the right intent
Use Topics to guide users through multi-step workflows
Call Power Automate flows for advanced branching and logic
Some of the most useful Docusign actions available today include, but are not limited to:
Create envelope using template with recipients and tabs
Send envelope
Generate Embedded Signing URL (V2)
List templates
Each of these can be plugged into an agent with just a few clicks—no development or coding experience required.
Use case: Create a Legal assistant agent
Picture a Legal team looking to streamline the process of sending contracts such as Non-Disclosure Agreements (NDAs). With Copilot Studio, they can create an agent that collects key information—such as the receiving party, NDA duration, additional clauses, and signer details—and automatically sends a pre-configured NDA template through Docusign.
Let’s build an agent for this use case using Docusign tools in Copilot Studio.
Prerequisites
Before you begin building your AI-powered agreement automation agent, make sure you have the following in place:
Docusign account and templates: You will need an active Docusign account. For scenarios such as sending NDAs, it's crucial to have predefined Docusign templates (for example, "Fontara NDA Template") already set up in your Docusign environment.
Microsoft Copilot Studio: Access to Microsoft Copilot Studio is essential, as this is the primary platform where you will build and manage your conversational agents.
Generative AI orchestration enabled: When creating your agent in Copilot Studio, ensure that "Generative AI orchestration" is turned on. This feature allows the agent to dynamically configure inputs and proactively prompt users conversationally for any missing required information.
Established connection to Docusign: During the initial setup or testing phase, you will need to authenticate your Docusign connection within Copilot Studio. If prompted for a connection, select "Open connection manager" and follow the steps to verify your credentials.
Step-by-step configuration breakdown
Step 1: Create a new agent in Copilot Studio
Open Copilot Studio from your Microsoft 365 environment.
From the left navigation pane, select Agents and then + New Agent.
Enter a Name (for example, “My Legal Assistant”) and provide a description of what the agent should do.
Under Orchestration, make sure the Use generative AI to determine how best to respond to users and events toggle is switched on. This setting enables your agent to dynamically prompt users for missing information in a conversational way.
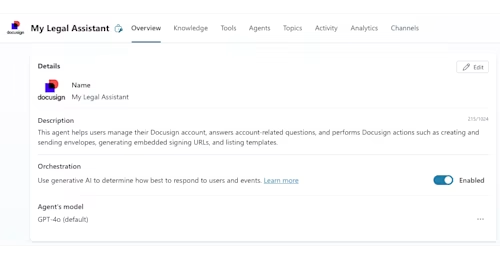
Select Create to finish setting up the agent.

Step 2: Add the Docusign tools
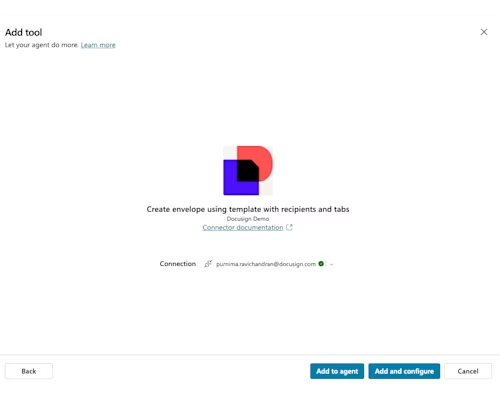
Go to the Tools tab of your agent.
In the search bar, type “Docusign” and then select Create envelope using template with recipients and tabs.

Select Add & Configure.
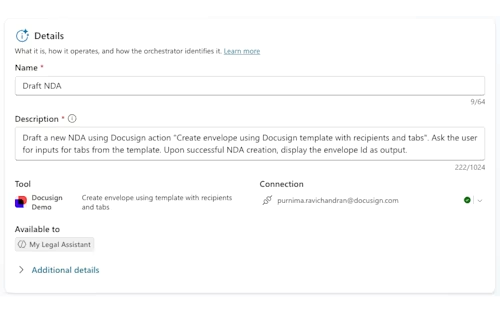
Rename the tool to a friendly name, such as “Draft NDA”.
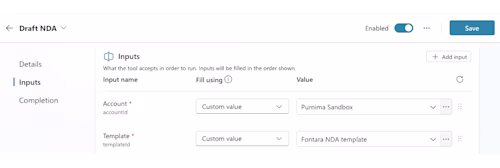
Configure the inputs:
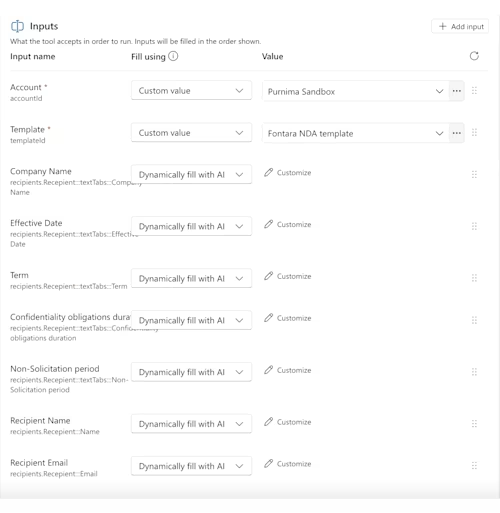
Account: Choose Custom value and select your Docusign account.
Template: Choose Custom value and select your prebuilt NDA template.
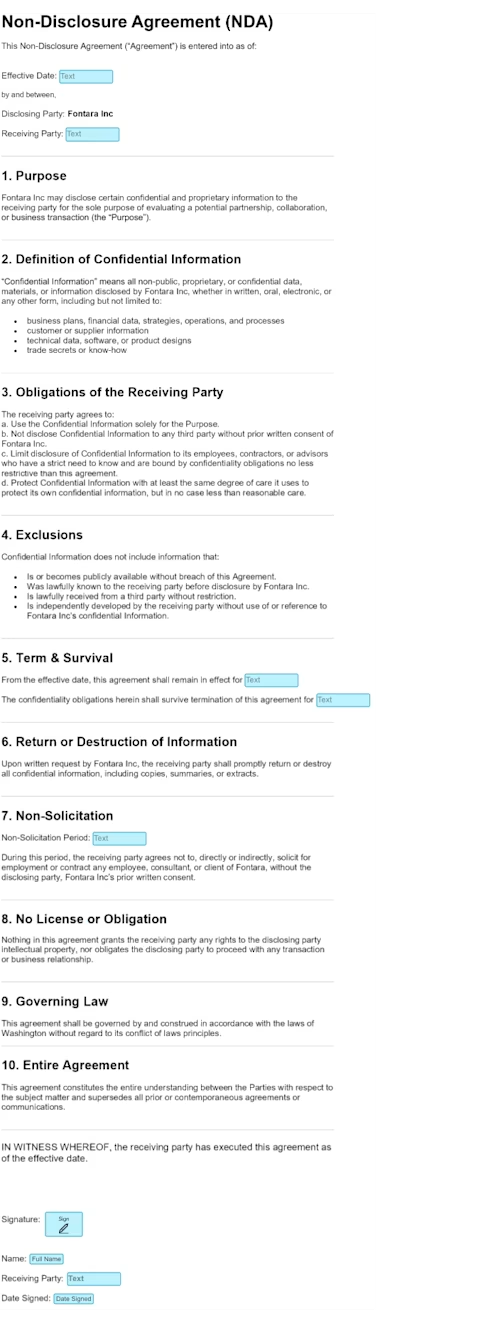
Try this Docusign template that can be configured from your Docusign account and tabs added as inputs in the next step. Disclaimer: This template, including sample clauses and names, is provided solely for demonstrating agents. It is intended only to illustrate how templates can be used in a demo scenario.
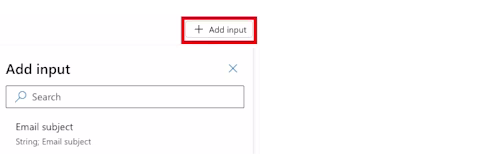
Select Add input to define additional details you want the agent to collect; for example:
Company Name: mapped to Receiving Party of the NDA
Recipient Name: mapped to Recipient Name
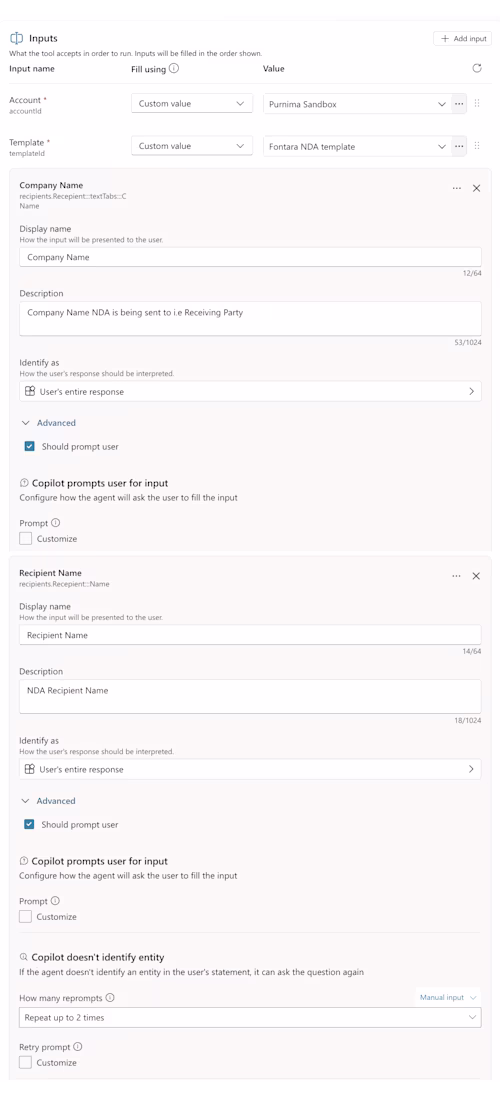
Add more tabs from the template that need to be prepopulated, such as Effective Date, NDA Term, Recipient email, and others as appropriate. Including these inputs is optional and depends on how the template is configured and the specific use case.
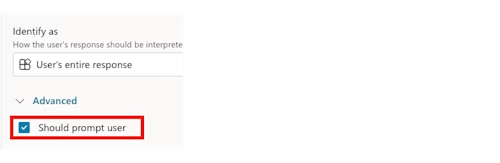
For all inputs, enable the setting Should prompt user. This ensures the agent will ask the user conversationally for any information that is missing.
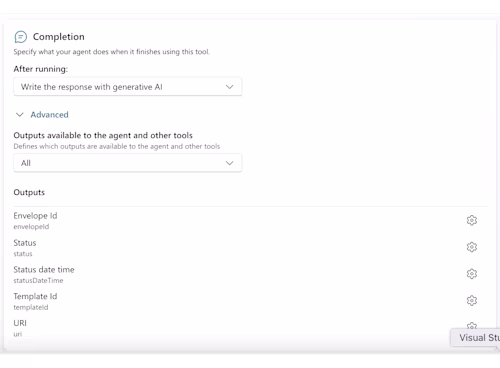
Update the Completion settings to Write the response with generative AI and confirm that the Envelope ID is included as an available output.
Save.


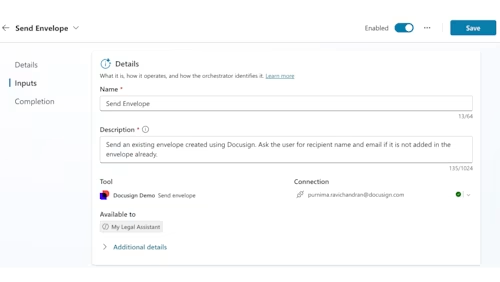
Step 3: Add the “Send Envelope” Tool
Still in the Tools tab, search for the Send envelope Docusign action.
Select Add & Configure.
In the Description field, provide guidance for the agent.
If it’s required, configure or update the Additional details section.
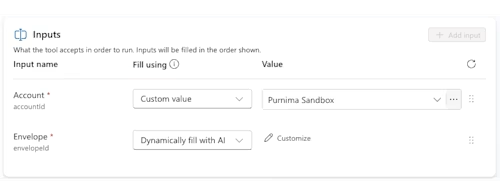
Configure the inputs:
Account: Choose Custom value.
Envelope: Choose Dynamically fill with AI. This allows the agent to automatically pick up the envelope ID generated by the previous “Draft NDA” action.


5. Update the Completion settings to Write the response with generative AI.

6. Save.
Step 4: Test the agent
Now that your tools are configured, it’s time to test the agent.
Open the Test pane on the right-hand side of Copilot Studio.
Type a test prompt such as: “Help me draft a new NDA.”
The agent should respond by asking follow-up questions: receiving party or company name, effective date, NDA term, recipient name and email etc.
Once all details are collected, the Draft NDA tool executes and an envelope draft is created in your Docusign account.
If you are prompted for a connection:
Click the Open connection manager link from the message.
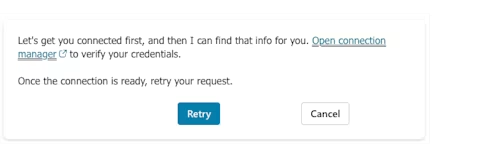
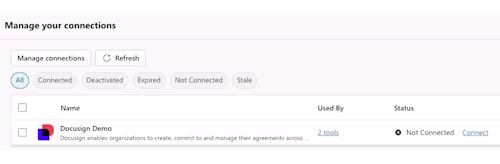
A new tab will open with the Manage your connections page.
Locate the Docusign connection and click Connect.
Sign in with your Docusign credentials and authorize the connection.
When complete, return to Copilot Studio and click Retry from the same message in the test pane.
The tool should now execute successfully, and the envelope ID/URL will be populated.
(Optional validation) Open Docusign eSignature and then navigate to Agreements > Drafts to confirm that the offer letter envelope has been generated correctly.
In the same Copilot Studio test chat, type this prompt: “Send this NDA”
The agent will trigger the Send Envelope tool and deliver the NDA to the recipient.
Verify in your Docusign account that the envelope has been sent.


Congratulations! You’ve successfully created your agent and sent the agreement!


Notice how the agent can interpret multiple inputs when they’re provided in a single sentence. You can supply details one at a time, or in some cases, combine them—and the agent should be able to map each input to the appropriate field.
To send the agreement after initial validation from Docusign drafts, enter a prompt such as “Send the NDA”:

Here’s how the NDA sent to the recipient looks. Note: All the inputs entered in the agent are automatically populated in the agreement.


From here, the best way to fine-tune your agent is to keep iterating: test frequently with different prompts, update the description or instructions, and retest.
Guardrails, not guarantees
A key point to understand upfront: Agents are fundamentally different from deterministic workflow. The natural language guardrails built into the agent builder help dictate behavior and guide responses, but they do not eliminate the chance of mistakes. That’s why it’s best to choose use cases where the impact of errors by AI is low and actions are easy to verify, reverse, or correct.
With Generative AI orchestration enabled, agents may produce slightly different responses to the same prompt. It’s best to test frequently, make adjustments, and continue refining until the agent behaves consistently with your team’s needs.
Deploying agents to Microsoft Teams and M365 Copilot
Once created and tested, your agent can be deployed directly into the tools your teams already use, such as Microsoft Teams or M365 Copilot—meeting users right where they work. And it’s not just for for Legal: Sales, HR, Procurement, and all other teams can all benefit from automating their own agreement workflows with agents. Even better, your Docusign agent can work alongside other capabilities available in Microsoft Copilot, giving you a connected Copilot ecosystem that streamlines processes across the business.
Use cases across teams
Beyond Legal, agents can streamline agreement workflows for other departments:
Team | Use case |
HR | Send offer letters, policy or relocation agreements |
Sales | Automate contract generation and approvals |
Procurement | Vendor onboarding and agreement routing |
Key benefits
The integration of Docusign and Microsoft Copilot Studio offers a multitude of benefits for organizations:
Streamlined processes: Automate repetitive agreement tasks
No-code empowerment: Build without relying on developers
AI-powered intelligence: Conversational input collection and orchestration
Flexibility: Chain multiple Docusign actions or integrate with other Microsoft 365 systems
Scalability: Extend automation across teams and use cases
Conclusion
With Docusign + Microsoft Copilot Studio, you can combine natural language, no-code tools, and generative AI orchestration to build agents that streamline agreement workflows end to end.
Start small with one repeatable scenario. Then refine, expand, and scale across other teams. Legal, Sales, HR, Procurement, and more: every department can benefit from copilots and agents that handle agreements quickly, accurately, and right inside the apps people already use.
The result: smarter, faster, and more connected agreement workflows—meeting your teams where they work and transforming the way business gets done.
Additional resources

Purnima Ravichandran is a Principal Partner Solutions Architect at Docusign, specializing in Intelligent Agreement Management (IAM) and Microsoft integrations. With deep Microsoft expertise and a passion for AI, she partners with customers and partners to deliver innovative solutions that accelerate digital transformation.
Related posts


Docusign IAM is the agreement platform your business needs
